
Set Up Jupyter Notebook for Training Course
We use Jupyter Notebook in our training courses. Jupyter Notebook is an open-source web application that supports over 40 programming languages, including Python. It allows code to be broken into “blocks” that run independently, which makes it ideal for beginners. Jupyter Notebook is also very useful for troubleshooting, exploring new datasets, and writing new functions.
Follow the steps below to ensure that Jupyter Notebook is set up correctly and the "satellite_aerosol" environment is activated for your training course.
1. Launch Jupyter Notebook
Windows: go to Start menu → Anaconda3 → Jupyter Notebook
MacOS: open the Terminal and type jupyter notebook, then press Enter
Linux: open a terminal and type jupyter notebook, then press Enter
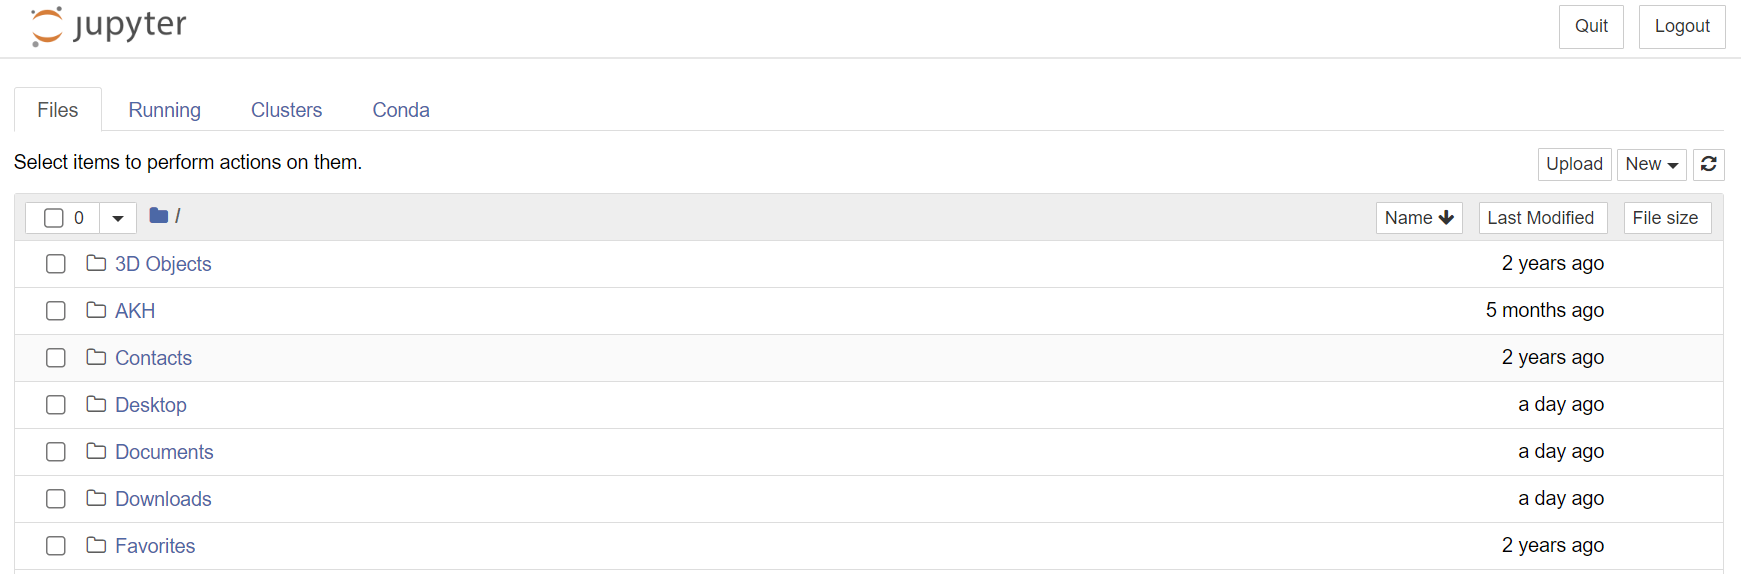
A tab in your default web browser (e.g., Chrome, Firefox, Safari) will open showing Notebook Dashboard (Jupyter Notebook’s home page). You should see the list of the files and subdirectories in the directory on your machine where Anaconda is installed. It will look similar to the image below (click image to open full size version).
2. Make a new folder in Jupyter Notebook & upload provided files
To facilitate the training session process, make a new folder (directory) in Jupyter Notebook and upload all of the code files provided for your training course to this folder.
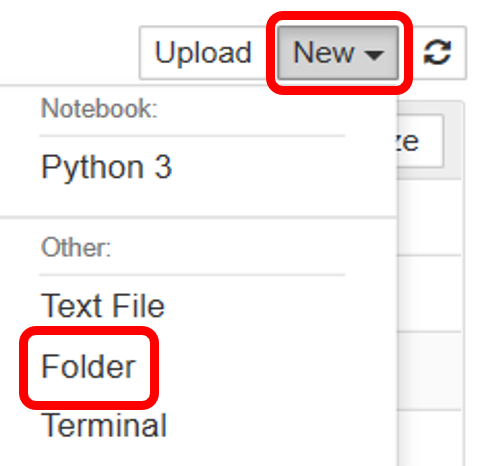
In the upper right-hand corner of the Jupyter Notebook home screen, click on the "New" drop-down button and select "Folder" as shown in the image below.
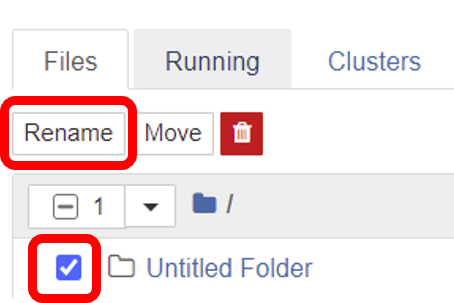
A new folder called "Untitled Folder" will appear in the list of files on the Jupyter Notebook home screen. To rename the folder, click on the little box to the left of the folder icon and then click the "Rename" button near the top of the page, as shown in the image below. You can name the folder whatever you'd like - perhaps "Satellite Training."
If you haven't already done so, download the .zip file containing the Python code files provided for your training; the link is available on the "Pre-Training Actions" tab for your specific training course. Open the .zip file on your computer, extract the contents and save them in a convenient directory, such as the Desktop.
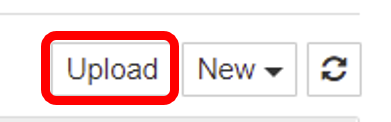
To upload files, click on the new folder you made in Jupyter Notebook to open it. Then click on the "Upload" button, located in the top right corner, next to the "New" drop-down button, as shown in the image below.
Select the files on your computer that you extracted from the provided .zip file. The file names will appear in your folder on Jupyter Notebook. To finish uploading, click on the blue "Upload" button for each file, seen in the image below (click image to open full size version).
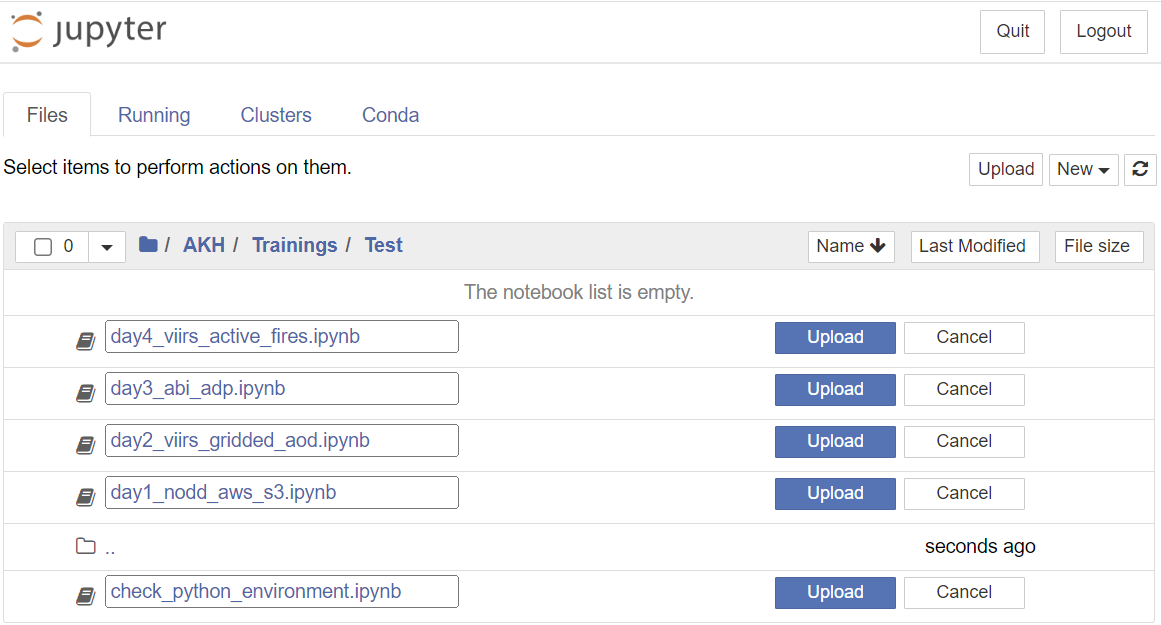
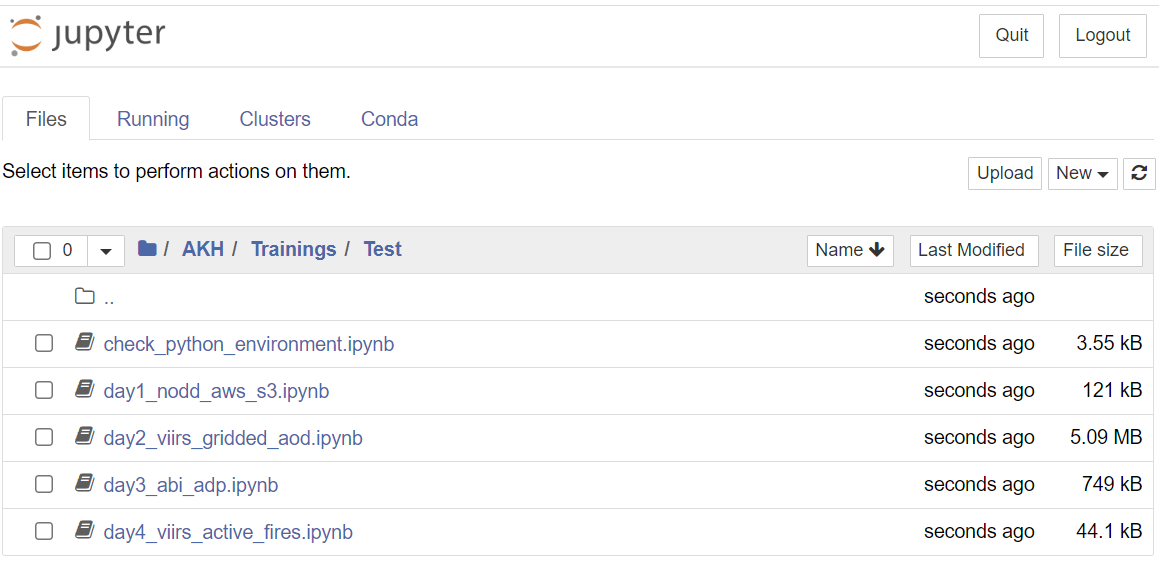
When you have finished uploading the provided files for your training course, the folder you created on Jupyter Notebook will look similar to the image below, but with a list of files specific to your course (click image to open full size version). For best results during the training, put all of the provided files in the same folder on Jupyter Notebook!
3. Activate Python environment & check it was installed correctly
If you haven't already done so, follow the instructions to create the "satellite_aerosol" Python environment and install the nb_conda_kernels package in your Anaconda "base" enviroment. These steps will allow you to run the training code files using the necessary Python packages.
To test that the Python environment and "nb_conda_kernels" package were installed correctly, you need to activate the enviroment and run the "check_python_environment.ipynb” file.
Click on the “check_python_environment.ipynb” file in your Jupyter Notebook training course folder; the file will open in a new browser tab.
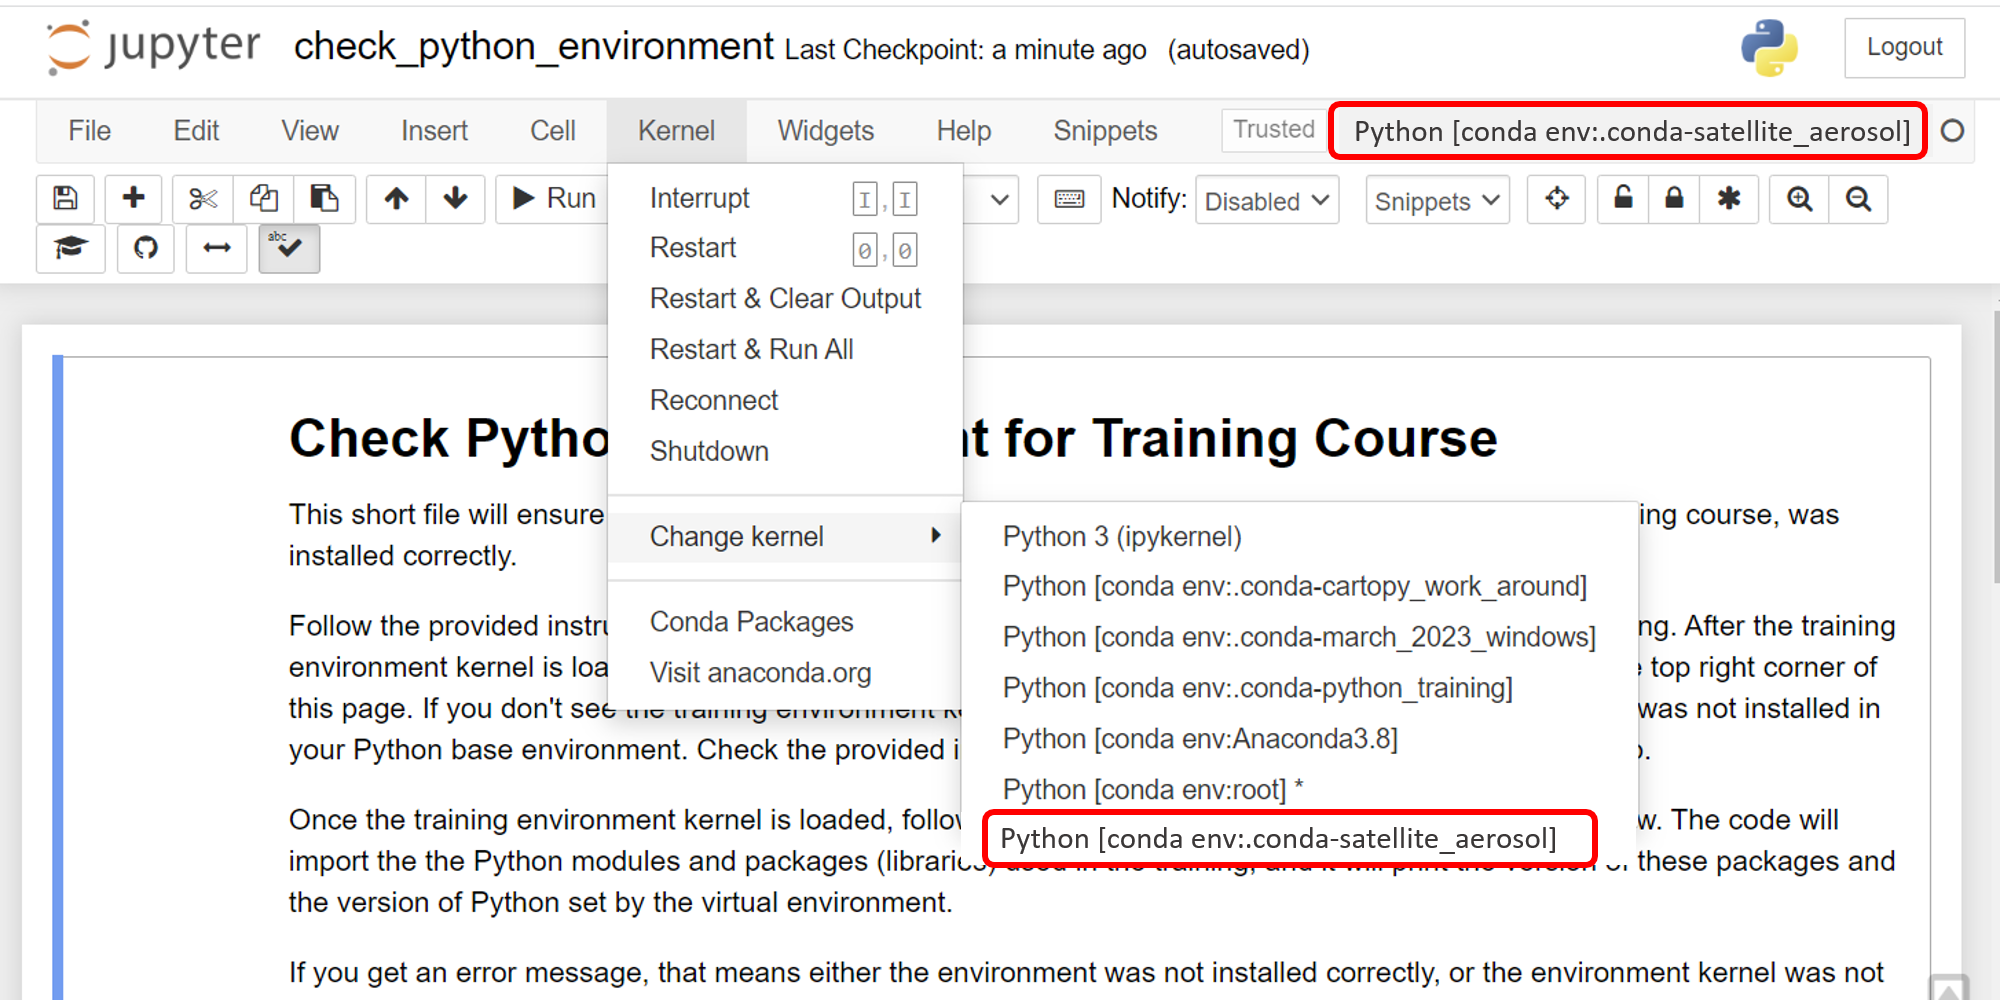
In the horizontal pull-down menu bar at the top of the page, click on Kernel and then Change kernel and select Python [conda env:.conda-satellite_aerosol] as shown in the image below (click image to open full size version). Note: you will NOT have all of the Python conda enviroments shown in the example image!
If you don't see the Python [conda env:.conda-satellite_aerosol] kernel option, then the nb_conda_kernels package was not installed in your Anaconda "base" environment. Contact the training instructor if you need help.
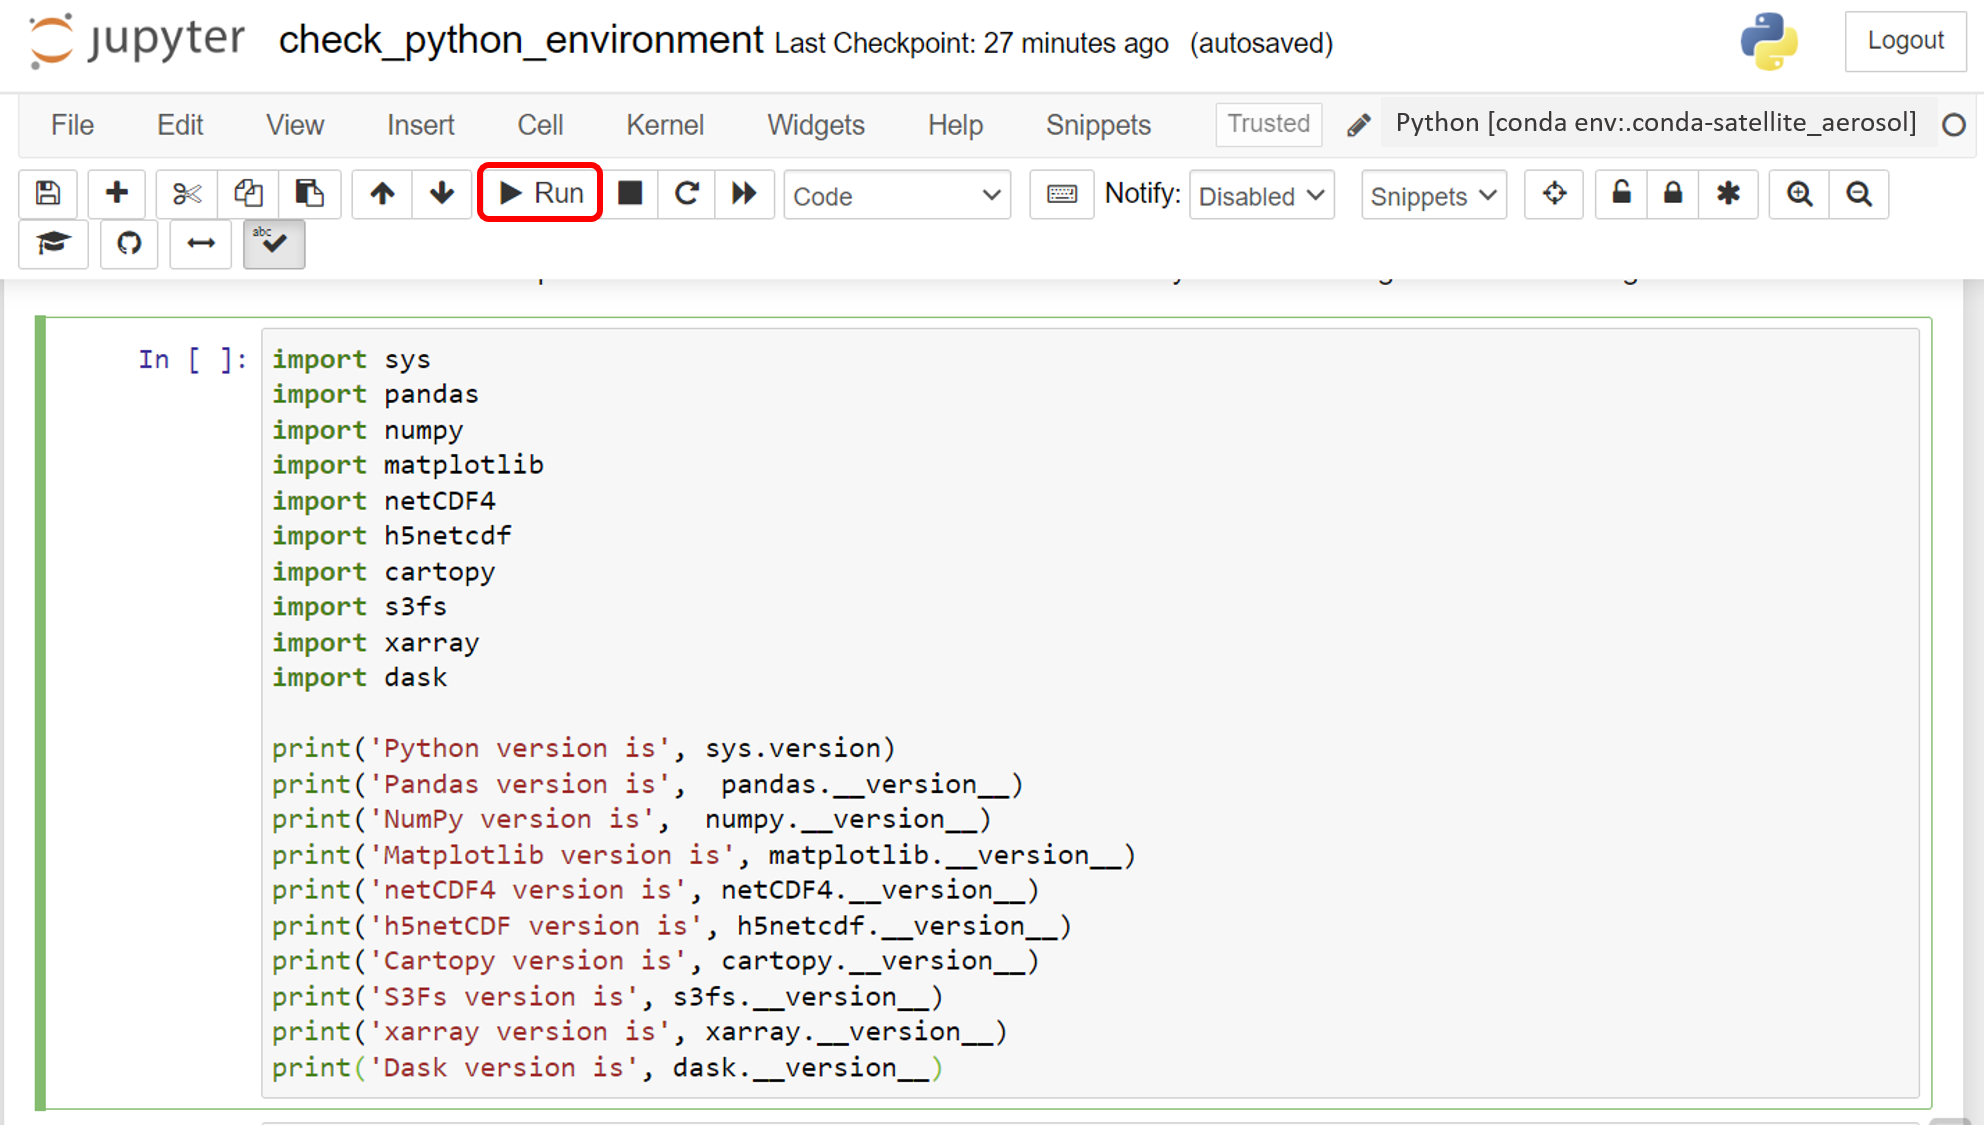
It will take a few seconds for the new kernel to load. When it is finished, you should see Python [conda env:.conda-satellite_aerosol] in the top right corner of the page, circled in the image below.
After the new kernel has loaded, place your cursor anywhere in the code block; you will see a green box appear around the block. To run the code, click the Run icon in the horizontal bar of icons near the top of the page, as shown in the image below (click image to open in a separate tab).
The code will take a few seconds to run. When it is finished, you should see output below the block: the version of Python and packages installed in the environment.
If the output from the code block looks like what is shown below, congratulations! You are all set for the training course! You can close the browser window/tabs for the Notebook Dashboard and the “check_python_environment.ipynb” file; this will automatically close Jupyter Notebook.
If you got an error message when you ran the code block, either the Python environment was not installed correctly, or the environment kernel was not selected. Contact the instructor if you need help.
import sys
import pandas
import numpy
import matplotlib
import netCDF4
import h5netcdf
import cartopy
import s3fs
import xarray
import dask

print('Python version is', sys.version)
print('Pandas version is',  pandas.__version__)
print('NumPy version is',  numpy.__version__)
print('Matplotlib version is', matplotlib.__version__)
print('netCDF4 version is', netCDF4.__version__)
print('h5netCDF version is', h5netcdf.__version__)
print('Cartopy version is', cartopy.__version__)
print('S3Fs version is', s3fs.__version__)
print('xarray version is', xarray.__version__)
print('Dask version is', dask.__version__)
Python version is 3.9.16
Pandas version is 1.5.1
NumPy version is 1.23.4
Matplotlib version is 3.6.2
netCDF4 version is 1.6.2
h5netCDF version is 1.0.2
Cartopy version is 0.21.0
S3Fs version is 2022.11.0
xarray version is 2022.11.0
Dask version is 2022.7.0